Introduction
In order to execute shell commands from a deployment plan Attini has a feature called the Attini Runner. The Runner uses AWS ECS Fargate to run a container that will execute any command from within your AWS account. The Runner has a few noteworthy features.
Reusable between executions
The container stays warm between executions, making it very fast when doing iterations during development. How long the container is allowed to be idle before terminating can be configured in the deployment plan template. If the configuration for the Runner is changed between executions, it will automatically restart with the new configuration.
Parallel executions
The Runner supports parallel executions. How many jobs can be executed in parallel can be configured in the deployment plan template. The deployment plan puts jobs on an SQS Queue that the Runner reads from. So when the cap for parallel executions is reached jobs will simply start stacking on the queue until they can be read and executed.
Custom Images and Roles
By default, Attini comes with a default Runner that will be used if nothing else is specified. However, you can specify your own ECS task definition if you would like to use a custom image. You can also override the IAM Role for any task definition, including the default, if you want more specific access control.
Access to all files in the Distribution
All jobs executed by the Runner will get its own copy of all files in the Distribution.
Output to the terminal
The output from the execution is split into 2 streams. One stream will go to standard out so that they end up in your log service, for example CloudWatch. The other stream will be managed by the Attini Framework (stored on S3) and it will be automatically read by the CLI, so that you never need to leave your terminal to see whats going on.
How to use
To use the Runner you need to create an AttiniRunnerJob step in your deployment plan. The minimal configuration for the AttiniRunnerJob step looks like this:
Type: AttiniRunnerJob
Properties:
  Commands:
    - String
It simply takes a list of commands that will be executed. Since there is no Runner specified, the default Runner will be used. Optionally you can specify your own Runner by setting the “Runner” field under the Properties section. The value of the “Runner” field should be the name of a Runner resource declared in the deployment plan template. A Runner can not be shared between different Distributions, however different runners can share the same task definition.
To specify your own Runner you add a Runner definition to the init stack resources. By specifying our own Runner we can add some configuration to it, like startup commands, Roles and different timeouts. Startup commands are commands that will run everytime the Runner has a cold start, meaning it is a good place to run installation commands. However, if you use your own custom image it makes more sense to install programs directly when creating it. But doing installations during startup is still valid if you don’t use your own image or simply want to test something without creating a new image every time.
A Runner with some configuration could look like this:
Resources:
  MyRunner:
    Type: Attini::Deploy::Runner
    Properties:
      Startup:
        Commands:
          - yum install nc -y
      RunnerConfiguration:
        IdleTimeToLive: 120
        JobTimeout: 60

 ....deployment plan and other resources
A Runner can also be configured to use your own ECS Task Definition, giving you complete control over access, what image to use etc. For a complete list of all Runner Configuration, please read the Runner documentation.
Demo
For this demo we will start by creating a distribution with a deployment plan containing a single step. This step will simply list the contents of the runners current directory using the “ls” command. The distribution has the following file structure:
.
├── attini-config.yaml
└── deployment-plan.yaml
And our deployment plan looks like this:
  RunnerDemo:
    Type: Attini::Deploy::DeploymentPlan
    Properties:
      DeploymentPlan:
        - Name: ListContents
          Type: AttiniRunnerJob
          Properties:
            Commands:
              - ls
That’s it! When we deploy the distribution to our environment Attini will start a container and run the command.
Let’s package and deploy it using the deploy run command from the root of the distribution.
attini deploy run .
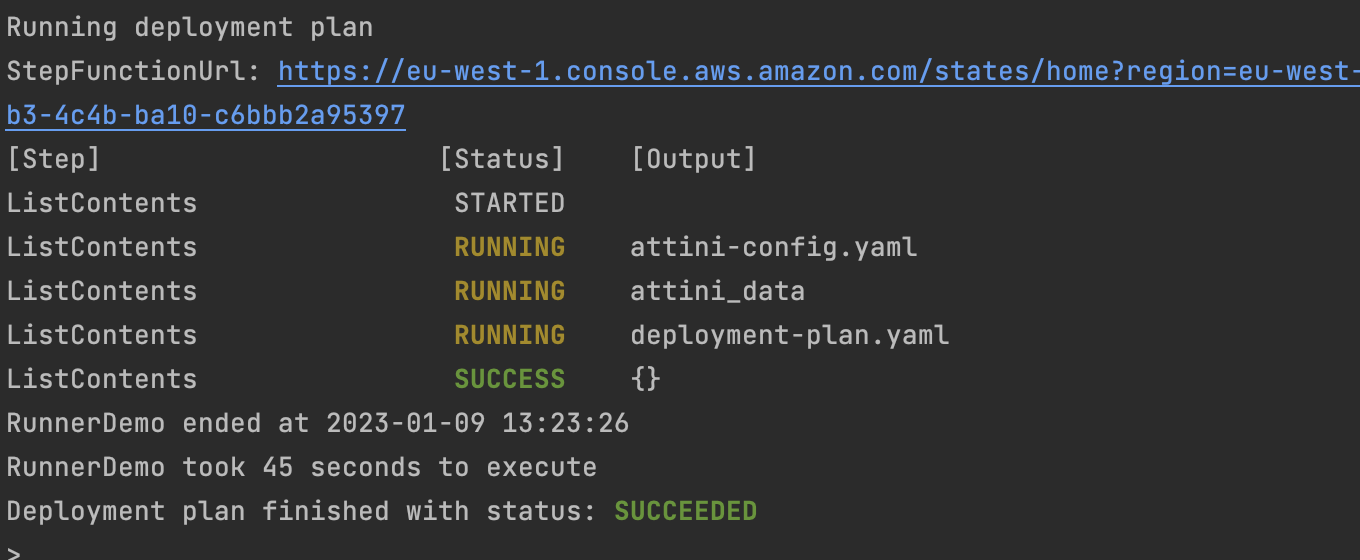
We can see the result of the command in the terminal. We can also see that all the files from our distribution are present. The attini_data folder is created during the packaging of the distribution and contains some framework files that are not important for this demo.
Because we had to start the container, the deployment took a bit longer. If we redeploy the Distribution right away it will be much faster due to the container already being started. By default, the container will stop after 15 min of idle time. However, we can change this by configuring our own runner. We do this by adding a runner resource to the deployment plan template and configuring the step to use it.
Resources:

  CustomRunner:
    Type: Attini::Deploy::Runner
    Properties:
      RunnerConfiguration:
        IdleTimeToLive: 600

  RunnerDemo:
    Type: Attini::Deploy::DeploymentPlan
    Properties:
      DeploymentPlan:
        - Name: ListContents
          Type: AttiniRunnerJob
          Properties:
            Runner: CustomRunner
            Commands:
              - ls
In the above example we configured a new Runner that will stop after 10 min of idle time. Because we are no longer using the default Runner, its resources will be deleted next time we deploy the distribution. This is good because it keeps our environments clean, but it also means that the next deployment will take a bit longer because we have to wait for the resources to be deleted before we can proceed.
Input and output
The deployment plan payload is available to the job via a JSON formatted input file located on the Runners file system.
The system variable “ATTINI_INPUT” tells the job where this file is located, so it is easy to access the payload, for example using cat or jq.
If we want to pass data from the Runner we can do this by writing data to the output file. The path of the output file is available via the “ATTINI_OUTPUT” system variable.
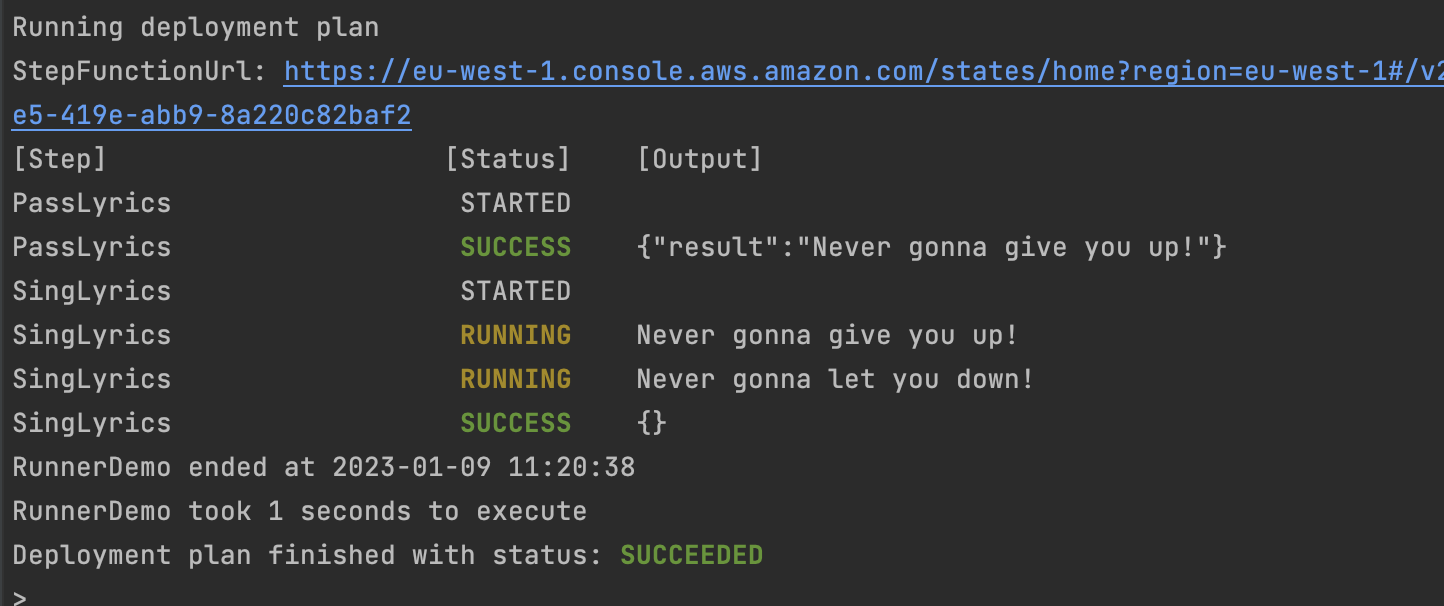
To demonstrate passing data we will create a new deployment plan with two steps.
The first step will write some text to the output and the second step will read it and print it to Stdout so we can
see the result.
  CustomRunner:
    Type: Attini::Deploy::Runner
    Properties:
      RunnerConfiguration:
        IdleTimeToLive: 600

  RunnerDemo:
    Type: Attini::Deploy::DeploymentPlan
    Properties:
      DeploymentPlan:
        - Name: PassLyrics
          Type: AttiniRunnerJob
          Properties:
            Runner: CustomRunner
            Commands:
              - echo "Never gonna give you up!" > ${ATTINI_OUTPUT}
        - Name: SingLyrics
          Type: AttiniRunnerJob
          Properties:
            Runner: CustomRunner
            Commands:
              - cat ${ATTINI_INPUT} | jq .output.PassLyrics.result
              - echo Never gonna let you down!
In the above example, we use jq to read the Lyrics from the output. Because we are using Attinis default Runner image, jq is already installed. But if it was not we could always install it via a startup command.
Because the output is passed via the deployment plan payload it has to be valid JSON. When it is not the Runner will treat the output as a string and put it in a JSON object under the “result” key.
Executing script files
In the previous examples, we specified all shell commands inline. This is perfectly valid, but it does mean that each time we make a change to our commands we have to update the deployment plan stack. It also creates a bit of clutter and makes reusing commands impossible. To avoid this we can always move our commands to a script file and execute that instead. So let’s update our distribution, so it looks like this:
.
├── attini-config.yaml
├── deployment-plan.yaml
└── sing-script.sh
With the sing-script file looking like this:
cat ${ATTINI_INPUT} | jq -r .output.PassLyrics.result
echo "Never gonna let you down!"
And finally, update the commands of the last step in the deployment plan to look like this:
Commands:
  - bash sing-script.sh
Now we can update the script without making changes to the deployment plan stack. Let’s deploy it one more time.
In the above example, the container was already running, making the deployment substantially quicker than when it had to do a cold start. The next time we want to update the script we won’t need to make changes to the deployment plan stack, making the deployment even faster.
Using your own image
What if we want to use our own Image instead if the default? There are two ways to do this:
- Specify an image in the Runner definition.
- Use your own ECS Task Definition.
The simplest way is to specify an image directly in the Runner definition. For example, if we wanted to update the previous example to use the latest amazon linux image, it could look like this:
Resources:
  CustomRunner:
    Type: Attini::Deploy::Runner
    Properties:
      Image: public.ecr.aws/amazonlinux/amazonlinux:latest
      Startup:
        Commands:
          - yum install jq -y
      RunnerConfiguration:
        IdleTimeToLive: 600
Our new image does not have jq installed. We use jq in our deployment plan, so we need to install it. We can do that easily
using a startup command.
When specifying an image in the Runner definition, Attini will create an ECS Task Definition for us. If we want to we can use our own Task Definition instead. To use your own Task Definition, set the “TaskDefinitionArn” property in the Runner definition. You can use an already existing Task Definition, or define one in your deployment plan template using CloudFormation, and use the Ref function to get the Arn. Because a Task Definition already specifies an image, you can not set both the “TaskDefinitionArn” and the “Image” property in the same Runner definition.
Example files
deployment-plan.yaml
AWSTemplateFormatVersion: "2010-09-09"
Transform:
  - AttiniDeploymentPlan
  - AWS::Serverless-2016-10-31

Resources:

  CustomRunner:
    Type: Attini::Deploy::Runner
    Properties:
      Image: public.ecr.aws/amazonlinux/amazonlinux:latest
      Startup:
        Commands:
          - yum install jq -y
      RunnerConfiguration:
        IdleTimeToLive: 600

  RunnerDemo:
    Type: Attini::Deploy::DeploymentPlan
    Properties:
      DeploymentPlan:
        - Name: PassLyrics
          Type: AttiniRunnerJob
          Properties:
            Runner: CustomRunner
            Commands:
              - echo  "Never gonna give you up!" > ${ATTINI_OUTPUT}
        - Name: SingLyrics
          Type: AttiniRunnerJob
          Properties:
            Runner: CustomRunner
            Commands:
              - bash sing-script.sh
attini-config.yaml
distributionName: attini-runner-demo
initDeployConfig:
  template: deployment-plan.yaml
  stackName: ${environment}-${distributionName}-deployment-plan

package:
  prePackage:
    commands:
      - attini configure set-dist-id --random
sing-script.sh
cat ${ATTINI_INPUT} | jq -r .output.PassLyrics.result
echo Never gonna let you down!